


These came in by email, and I always figure if one person is asking, many more are wondering.
The last first- too few:
When the rug is cupping up, you've put in too few double stitches. If you catch it early on, and depending on how tightly you stitch, what kind of material you're using, and so forth, usually no drastic action is necessary. Just make sure to put a normal number of double stitches in the following rows, and it will probably flatten out.
In extreme cases though, you will have to pull out a row or two. Except for where you've joined one strip to another... I usually just snip the joints out rather than try to pull them through.
Ripples and Waves- Too Many Doubles:
This is more often my problem, especially since I stitch so tightly. Unless you're sewing very loosely, or catch it early, you'll almost always have to undo to correct this.
The rug I'm working on currently has had this problem, but I'm trying to correct for it because I'm sewing it very loosely and using much more thin strips of fabric than usual. No, its not the rug most recently pictured. As per my next post, our life has turned upside down, so...
So, you'll be able to see when I'm finished with my "sari rug" as I call it how well trying to counter the ripples worked.
The big exception to both of these: Working with fabrics with spandex (such as hosiery) or plastic bags.
Both make wonderful rugs... I think rugs made from old pantyhose feel the best to walk on. But both of these are very unforgiving. Its easy to overstretch any fabric with "give" in it, only to find your rug is trying to self form itself into some bizarre 3D shape. Plastic bags, on the other hand, will NEVER stretch out. You have to keep the number of doubles just right with them from start to finish.
Clockwise vs. Counterclockwise = right / left handed
It was recently observed that the rug start I posted October 2nd seems to be going in a counterclockwise spiral. In the picture, indeed so it seems. When I work on it, however, its back is towards me, and I stitch with my right hand, so I actually go clockwise.
Left handed people tend to spiral in the opposite direction.
As I do many other things left handed, I've had no trouble teaching people to do it that way, and can stitch left handed also, just not as quickly.
Showing posts with label QNA. Show all posts
Showing posts with label QNA. Show all posts
Saturday, October 25, 2008


Monday, March 31, 2008
Q&A- How long to make the strips? - AND- An intersting site to check out- knitted rag rugs
A friend of mine just made me aware of this site http://shewhomeasures.wordpress.com
An entry which may be of interest is one on making one long strip from a large piece of fabric.
I've tried similar things before, but found that it didn't usually work for this technique because the corners tended to "rip out." But maybe it'll work for others of you... if it does, wunderbar! Let me know!
I have used a spiral cut with pantyhose, socks, and other very "givey" or stretchy fabrics.
An entry which may be of interest is one on making one long strip from a large piece of fabric.
I've tried similar things before, but found that it didn't usually work for this technique because the corners tended to "rip out." But maybe it'll work for others of you... if it does, wunderbar! Let me know!
I have used a spiral cut with pantyhose, socks, and other very "givey" or stretchy fabrics.
| Q&A: So long do you make the strips? |
That varies on
Obviously, longer the strip, the more you have to pull through on each stitch. Correspondingly, the shorter the strip, the more junctions you need. For my purposes, I've found that strips longer than 3' get unwieldy, but my sister who stitches much more loosely than I commonly uses strips twice that long. With the looser stitch, there's less friction. Its all a matter of personal taste. You know over arching philosophy with this is- this craft should be about fun, about making treasure from trash, not rules. So... experiment with different lengths and different fabrics. If the strip is too long and gets unwieldy, just chop it, put slits in each end, and do a joint when its time. HAVE FUN, and do what works for YOU! |
Q&A: How much material is needed for a "normal" rug?
My dear friend is full of great questions today! Glad to answer them. I know being the husband of a disabled professor, that the question one person asks, 10 people have in their heads.
This is a more complicated question though, not quite so suitable to the "Q&A format" of the previous two posts.
There are SO many variables. Synthetic fabrics, for example, are lighter than cotton, which is lighter than linen. The plastics from which I make my umbrella/shopping bag/shower curtain rugs are VERY light, which is why that's the rug I usually take with me on the "L" or to Tess' doctor.
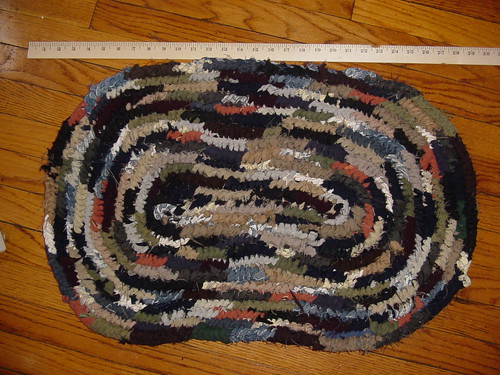
I have noticed, however, that one BIG gym bag full of strips will make a rug about the size of the rug shown above.
I can also tell you that this rug was made out of cottons and cotton polys- probably 2/3 cotton by weight. I weighted the clothesbefore I started the rug, and it came out to around 25 pounds. (Because I've been doing this so long, I knew what size I wanted the rug, and about what size the pile of "raw clothes" had to be to make it.) Zippers, seams, pockets removed, the finished rug was closer to 20 pounds.
So if you use clothing which is a mixture of cotton and poly, and want a rug about this size, this should give you some idea of how much by weight you'll need. For an all cotton rug, you'll need more by weight, for one heavier in synthetics, you'll need less by weight.
One other relevant hint: For my stitching, I've noticed that VERY consistently, 1 foot of strip = 1 inch of stitch!
Q&A: Mixing materials in a rug - The "Levitical myth"
I decided to make this a separate "Q&A" post because it comes up a lot.
I call it the "Levitical myth" because Lev. 19:19 (among other places in the OT) prohibits the mixing of two different fibers together in cloth.
The specific question as seen in the comment to the previous post was if she could start with flannel and add other things later, but I'm going to abstract it out to be more generally relevant.
There's no functional reason why you can't mix different types of fabrics together in the same rug, or even fabric and non-fabric. One of my most beautiful rugs was one with a leather center and a blue jean body (pictures and a video of it are in back posts.)
The major issues are:
On functionality for example... I like to make rugs from plastic bags, shower curtains, and umbrellas to use in the bathroom and kitchen. You'd totally destroy the functionality of these rugs for use in wet areas were you to mix in normal fabrics which absorb water.
Likewise, jean rugs are great for heavy use areas, places where pets and children are likely to get to them, etc. Chiffon might look nice enough as an accent in such a rug, but its not going to be as durable.
But so long as the aesthetics & functionality work, and you adjust the strip width to get a relatively constant row thickness... have at!
I call it the "Levitical myth" because Lev. 19:19 (among other places in the OT) prohibits the mixing of two different fibers together in cloth.
The specific question as seen in the comment to the previous post was if she could start with flannel and add other things later, but I'm going to abstract it out to be more generally relevant.
| Q:Can you mix different types of materials in the same rug? Will it make the rug weaker or the junctions less durable? |
| A: In the broadest sense, the answers are "YES" and "NO," but see following discussion. |
There's no functional reason why you can't mix different types of fabrics together in the same rug, or even fabric and non-fabric. One of my most beautiful rugs was one with a leather center and a blue jean body (pictures and a video of it are in back posts.)
The major issues are:
- Aesthetics- how will they look together?
- Functionality- where and how do you plan to use the rug?
- Strip size- different materials need to be cut to different widths, or else the thicker fabric will tend to overwhelm the thinner rows, and create problems with the tension of the rug.
On functionality for example... I like to make rugs from plastic bags, shower curtains, and umbrellas to use in the bathroom and kitchen. You'd totally destroy the functionality of these rugs for use in wet areas were you to mix in normal fabrics which absorb water.
Likewise, jean rugs are great for heavy use areas, places where pets and children are likely to get to them, etc. Chiffon might look nice enough as an accent in such a rug, but its not going to be as durable.
But so long as the aesthetics & functionality work, and you adjust the strip width to get a relatively constant row thickness... have at!
Q&A: "I just put my foot through a flannel sheet, can I use it?"
Q: How do flannel sheets work up. I put my foot through a hole in my fitted sheet last week so figured it's time to rip the entire set up! |
A: Flannel sheets work great, but the weak spots or places where its thinned out you'll want to cut especially wide, and avoid having junctions in those spots. For the undamaged areas, you'll probably want to cut it 3/4ths to 1" wide... that should be enough to provide for the weakened areas provided their localized. If a large area of the sheet is getting thread bare or weak, increase that by 50%. |
The fabric itself feels great in a rug when done, very cozy, and since its cotton, the tension will even itself out nicely if you add or omit the occasional double/repeat stitch.
You'll find that it doesn't pull through quite as easily as broadcloth, since flannel does have a somewhat textured surface, but I've never found it a problem, and I stitch so tightly that people joke you could use my rugs as bullet proof vests. (Only my grandmother stitched more tightly- when she was done with a rug, she sometimes had to put it under several mattresses for several months to flatten it out! *grin*)
For the needle, I'd recommend one with a nice large hole, but a more rounded tip. If the sheet's already ripping, the last thing you need to do is "spear it" with an especially pointy/sharp needle.
| I think a rug made out of JUST the sheet set would look spectacular. Send me a picture when you're done, I'd love to feature it. |
| Same applies to other "Rugsters" out there, I'd love to share your pictures and stories! |
Wednesday, January 30, 2008
Q&A on rugs coiling up, buckling, cuping up, etc.
A youtube viewer of my videos, Rona, asks, "when making a rug do they tend to coil? or am I doing something wrong"
They do tend to cup up, this is very common, especially if you pull your stitches tightly as I do and my late grandmother did. She did hers so tightly she had to put piles of dictionaries on them for months to flatten them out.
The basic reason why this happens is that as you spiral your way outwards, each row is longer than the previous one. With my rugs, I've found they tend to increase by about an inch for each row on a round rug.
To address this, you need to add extra stitches called "doubles" or "duplicate" stitches, where you pass through the same bottom/base loop twice. If you don't, you wind up with a very thick stocking cap! (In fact, just for fun, I once made a stocking hat for our dog using very thin strips and this method.)
Generally, you need more double stitches early on- in the first 7 to 12 rows (when the rug is smaller than 16" across) than later.
For the first few rows, you might need doubles every other stitch.
Generally I recommend doing a double stitch every other stitch the first 4 to 6 rows, every third stitch the next 4 rows, and then go by feel.
This will vary by how tightly you stitch and which kind of material you use. The most fool proof method which I'll demonstrate when my wife is up to helping me do a video project is this: Look at the angle your needle is making between the baseloop and the top loop. If it is leaning backwards more than 30 degrees, its time for a double stitch.
Some people have trouble gauging this though, so a similar method to determine whether its time for more doubles is to just put the rug on a flat surface. If you can't make it lie flat easily, with very little effort, then you need to add more doubles.
If you are using a fabric which has spandex or a lot of give to it, you'll need to use a lot more double stitches, up to twice as many, which is one of many reasons I discourage beginners from using these materials until they are more confident with the technique.
Similarly in the opposite direction, plastic bags and very sturdy denim can be most unforgiving... they don't flatten out well.
If you have any more questions about this or any other issue, please post them. I love questions from you- it helps me know what I should be posting about, and helps me refine my teaching technique.
They do tend to cup up, this is very common, especially if you pull your stitches tightly as I do and my late grandmother did. She did hers so tightly she had to put piles of dictionaries on them for months to flatten them out.
The basic reason why this happens is that as you spiral your way outwards, each row is longer than the previous one. With my rugs, I've found they tend to increase by about an inch for each row on a round rug.
To address this, you need to add extra stitches called "doubles" or "duplicate" stitches, where you pass through the same bottom/base loop twice. If you don't, you wind up with a very thick stocking cap! (In fact, just for fun, I once made a stocking hat for our dog using very thin strips and this method.)
Generally, you need more double stitches early on- in the first 7 to 12 rows (when the rug is smaller than 16" across) than later.
For the first few rows, you might need doubles every other stitch.
Generally I recommend doing a double stitch every other stitch the first 4 to 6 rows, every third stitch the next 4 rows, and then go by feel.
This will vary by how tightly you stitch and which kind of material you use. The most fool proof method which I'll demonstrate when my wife is up to helping me do a video project is this: Look at the angle your needle is making between the baseloop and the top loop. If it is leaning backwards more than 30 degrees, its time for a double stitch.
Some people have trouble gauging this though, so a similar method to determine whether its time for more doubles is to just put the rug on a flat surface. If you can't make it lie flat easily, with very little effort, then you need to add more doubles.
If you are using a fabric which has spandex or a lot of give to it, you'll need to use a lot more double stitches, up to twice as many, which is one of many reasons I discourage beginners from using these materials until they are more confident with the technique.
Similarly in the opposite direction, plastic bags and very sturdy denim can be most unforgiving... they don't flatten out well.
If you have any more questions about this or any other issue, please post them. I love questions from you- it helps me know what I should be posting about, and helps me refine my teaching technique.
Monday, January 28, 2008
Q&A on how to start a rug, and which materials to use, carried over from Youtube
Over on Youtube, a person on viewing both my starting a rug from a braid and starting a rug using the half hitch method had this to say on the braid video when I suggested the half hitch as better:
First off, some historical background: This being a folk craft, the way it was taught and handed down in the past was by expert rug makers mentoring novices. This usually involved the mentor MAKING the first half dozen or so rug starts. The logic was... once you get comfortable with the stitch, once you get used to the fact that you can make "mistakes" and it will self-correct, you can better cope with making that great leap from a chain stitch or a braid to a regular row. I was making these rugs for almost 10 years before I did my first start.
I still think this is sound and is the best way, but over the years I've been teaching this, even though I can knock off a start in the time it takes me to walk the two blocks to the grocery store (and yes, I do stitch and walk at the same time... one of these days we'll have video of it) and have offered them to anyone who wants them, I found that anyone who wanted to learn the craft wants to know how to do it from start to finish.
I've struggled with how to teach this for years (I've been making these rugs over 30 years, and teaching the craft over 20, and mind you... I just turned 40), and its only recently that I decided it was plausible. To key things went into this:
1) The advent of inexpensive high quality video cameras (and if you've only seen the Youtube versions, wait till you see the Veoh versions below... Veoh streams at full D1 analog TV quality!)
2) I made a concerted effort to forget what I knew in terms of how its "supposed" to work, and come at it fresh.
Now... on to the issue at hand about starting rugs. While I do think the series of half-hitch knots is the best way to make an easy and strong start, really the best way for anyone is the one you can "grok"- grasp and put into effect. (Objectively speaking though, braids and half hitches will give a stronger center than a chain stitch.)
Which ever method you use, the trick is always the point at which you go from your start method... which ever it is... to doing the stitch. And that is pretty much the same which ever you use. You need a thumb loop and a base or bottom loop. How you get the thumb loop and how you decide which is your base loop is utterly irrelevant.
The other tricky thing is, for the first few times around the ends, you'll need to do triple or even quadruple stitches, and early on in a start, especially for a round rug, its not uncommon to need to do a double stitch every second or third stitch. When I learned, I asked my mother and grandmother for a mathematical ratio (so many doubles per row, decreasing at at a given rate for each succeeding row) because I always mix science with my art, and art with my science.
And if you would find that helpful... then here ya go... until the rug is well established, do a double stitch every other stitch for the 2 rows, then every third stitch for the next 2 rows, and so on. If doing an oval rug, that only applies to the ends.
That's not as exact as it sounds... it depends somewhat on how tightly you stitch and whether or not you use fabric with give, but I'm assuming (and dearly HOPING) a beginner isn't going to try using old pantyhose for his/her first rug! (Old hose make lusciously beautiful rugs which feel like you're walking on moss, but they are a devil to work with... you can't overpull or underpull or else it cups and pulls and ruffles...)
And speaking of fabrics with some give... my correspondent spoke of using T-shirts. They make fine rugs, and they're the sort of clothes most people have a pile of which should be recycled. (I'm wearing one such at the moment... the armpits are stained and are starting to come open, but... I digress.) Two major things to keep in mind when using fabrics which either have spandex or an open weave such they stretch is...
(I thought my poor wife was going to stick her needle through my septum when she came to her next fabric and it was cut from a lovely purple pair of corduroy pants! Cords are as heavy as jeans, but the nubbies make it stick to itself like velcro! )
Here's the high res Veoh versions of all my recent toothbrush rug tutorials and stories:
Online Videos by Veoh.com
I saw that one first but didn't strike home until I saw this one. Couldn't quite figure out where you were going with the half hitch.. why it was "easy". Makes sense now. (scurries away to find hubbies old t-shirts to practice with)
First off, some historical background: This being a folk craft, the way it was taught and handed down in the past was by expert rug makers mentoring novices. This usually involved the mentor MAKING the first half dozen or so rug starts. The logic was... once you get comfortable with the stitch, once you get used to the fact that you can make "mistakes" and it will self-correct, you can better cope with making that great leap from a chain stitch or a braid to a regular row. I was making these rugs for almost 10 years before I did my first start.
I still think this is sound and is the best way, but over the years I've been teaching this, even though I can knock off a start in the time it takes me to walk the two blocks to the grocery store (and yes, I do stitch and walk at the same time... one of these days we'll have video of it) and have offered them to anyone who wants them, I found that anyone who wanted to learn the craft wants to know how to do it from start to finish.
I've struggled with how to teach this for years (I've been making these rugs over 30 years, and teaching the craft over 20, and mind you... I just turned 40), and its only recently that I decided it was plausible. To key things went into this:
1) The advent of inexpensive high quality video cameras (and if you've only seen the Youtube versions, wait till you see the Veoh versions below... Veoh streams at full D1 analog TV quality!)
2) I made a concerted effort to forget what I knew in terms of how its "supposed" to work, and come at it fresh.
Now... on to the issue at hand about starting rugs. While I do think the series of half-hitch knots is the best way to make an easy and strong start, really the best way for anyone is the one you can "grok"- grasp and put into effect. (Objectively speaking though, braids and half hitches will give a stronger center than a chain stitch.)
Which ever method you use, the trick is always the point at which you go from your start method... which ever it is... to doing the stitch. And that is pretty much the same which ever you use. You need a thumb loop and a base or bottom loop. How you get the thumb loop and how you decide which is your base loop is utterly irrelevant.
- For the first stitch, just go through the first base loop and twist the thumb loop over.
- You'll probably need to go through the same bottom loop for your second stitch, and after this, it should look almost like a normal stitch.
- By the third stitch, which you can probably do on the next bottom/base loop, it will look and act like it should.
The other tricky thing is, for the first few times around the ends, you'll need to do triple or even quadruple stitches, and early on in a start, especially for a round rug, its not uncommon to need to do a double stitch every second or third stitch. When I learned, I asked my mother and grandmother for a mathematical ratio (so many doubles per row, decreasing at at a given rate for each succeeding row) because I always mix science with my art, and art with my science.
And if you would find that helpful... then here ya go... until the rug is well established, do a double stitch every other stitch for the 2 rows, then every third stitch for the next 2 rows, and so on. If doing an oval rug, that only applies to the ends.
That's not as exact as it sounds... it depends somewhat on how tightly you stitch and whether or not you use fabric with give, but I'm assuming (and dearly HOPING) a beginner isn't going to try using old pantyhose for his/her first rug! (Old hose make lusciously beautiful rugs which feel like you're walking on moss, but they are a devil to work with... you can't overpull or underpull or else it cups and pulls and ruffles...)
And speaking of fabrics with some give... my correspondent spoke of using T-shirts. They make fine rugs, and they're the sort of clothes most people have a pile of which should be recycled. (I'm wearing one such at the moment... the armpits are stained and are starting to come open, but... I digress.) Two major things to keep in mind when using fabrics which either have spandex or an open weave such they stretch is...
- you will need to cut your strips up twice as wide as if you were using- say- an old dress shirt or bedsheet.
- you do need to be careful to not pull the stitches too tightly, or else the rug will cup up into a basket. If you do find yourself pulling tightly, you can compensate by adding more double stitches.
(I thought my poor wife was going to stick her needle through my septum when she came to her next fabric and it was cut from a lovely purple pair of corduroy pants! Cords are as heavy as jeans, but the nubbies make it stick to itself like velcro! )
Here's the high res Veoh versions of all my recent toothbrush rug tutorials and stories:
Online Videos by Veoh.com
Subscribe to:
Posts (Atom)


