Tuesday, January 8, 2008

A video "tour" of my magnum opus rug, the "Anniversary Rug"

Here's a video tour of my magnum opus, the anniversary rug. I've been trying to get good stills to do it justice, but I've not been satisfied with the detail and color rendition yet, and since I've been promising to show you the finished product for some time, here you go.

Each rug has its own beauty both aesthetically and practically, but Tess and I think this is the most beautiful I've ever made. The design of it was free flowing but you'll notice some repeating elements / colors which unite it together, rather as the repeating theme unites a fugue

So the rug has four parts or stages:
  1. The center which features solid rows,
  2. The main body which features two types of rows:
    1. The first alternates solids and prints
    2. The second alternates solids so that different prints do not overlap each other, row to row
  3. The final stage which returns to solid blocks of color which do not form complete rows but whose length represents and approximates the prominence of those color elements in the previous two stages
  4. The final black finishing row, which echoes the solid black center and provides a visual frame.
It all sounds so planned when I talk about it that way, but in reality it wasn't. In fact... the center wasn't even planned to be our rug! Several of the solids were clothes I wore back when we met and I had a 33" waist, but the rug was initially planned for a friend, and was made up of the handiest congruent colors I could grab when we had to vacate our apartment for a few weeks because the water and heat had gone out and we had to make an impromptu visit to my mother's. The friend wanted a different color palette however, which was fine with us, as by then Tess and I had fallen in love with it. It was at that point we decide to make it a "remembrance rug"- we were nearing our 12th anniversary, and the center worked GREAT with the clothes from that era we'd been saving for just such a rug.

The next stage- the massive main body-I pretty much made up as I went along. I'd pull out an old piece of clothing, hold it up against the rug, and Tess and I decided whether or not it worked.

The final two stages were more carefully planned, to make sure it would finish off as beautifully as it'd started. I even lugged this beast on the "L" and bus to consult with Tess in the hospital room, since though I was making the rug, it celebrates OUR love and life together.

Generally most of my rugs are very "free form"

I throw together 20-30 pounds of clothes (the amount it takes for a 22-26" round rug) and decide what will work together. As I go along, I just try to follow the "dao" of the rug... I let it tell me what will look best.

To do otherwise would take something which is a relaxing stress relief for me and make it work. Some rug makers do much more elaborate designs, and should someone want to pay me enough to adhere to a tightly planned design, I'd do it, but otherwise... I just go with the flow.

The most elaborate design I've ever done is the "Berger Park / Lake Michigan Rug." If I've not posted pictures of it, I'll do it sometime soon so you can see what a more precisely planned rug looks like.

When my wife gets home from the hospital (at current projections, late this week, but this is one of her mist intractable migraines ever, so I'll believe it when she's home in my arms) I'll get a video of us talking about the various clothes which went into it- the dress she wore when we got engaged, my honeymoon silk bathrobe, etc. Maybe I'll have some stills which will do it justice by then.

The high quality Veoh version


Online Videos by Veoh.com

Should you have trouble with the Veoh version, look for it on Google Video or Youtube. I've been trying to upload it to the latter all day, and it hasn't worked yet.

Thursday, January 3, 2008

Tutorials: Finishing a rug, finishing off a solid color row


Background: I was finishing the rug made of the clothes my wife and I wore when we wooed and fell in love 13 years ago, and as she was in the hospital, and the rug celebrates our love and marriage, I lugged the huge rug down on the L and bus to finish with her.

(In a future post I will show detailed pictures of this, my "opus magnum" so you can see more detail. But for ease of people finding tutorials about various topics, I'm keeping those sorts of posts separate from these.)


When I was doing it, she wanted me to explain how you finish a color band row or solid color row, and as I had the camera along to take stills of her with the rug anyway, I recorded my final stitches and tying off of the rug while explaining it to her and answering her questions.

The lighting gives a spooky or film noir overtone, but I think the video is made better by my wife's interaction, as while a brilliant linguist and utter genius, she's just started doing this craft.


Finishing a row of one solid color


When finishing off a row of a given color or pattern, it is best to overlap by a few stitches so that the color is joined when the rug is viewed from any angle. This is especially important when the row is the final row of a rug, as in this case.

High res Veoh version


Online Videos by Veoh.com


Low res Youtube


Tying off the rug


When you're done with your rug, there's any number of ways to tie it down. The stitch is incredibly resilient, it isn't going to unravel or pull loose regardless. Still, this is how I usually do it.
  • I do the last few stitches very tightly (even for me)
  • I use a thinner strip or a graduated strip for an even blending of the end of the row into the preceding row.
  • For the final stitch, I pull it down as tightly as I can,
    • I run the strip in a basket weave pattern (over under) for three loops along the row,
    • I do three loops in the other direction along the previous row
    • And finally I tie it off using two half hitch knots (see previous post about these.)

Again, don't worry, do what ever you want and what ever works for you, but this technique will give you a clean visually attractive finish.

High res Veoh version


Online Videos by Veoh.com

Low res Youtube version


Wednesday, January 2, 2008

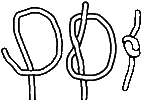
Starting a rug using overhand and half hitch knots


I'm always learning new things about this craft, just by paying attention to what its telling me. This morning I was tying off the end of a rug start I decided to convert to a trivet (you'll see it in the original untied form in a post later today or tomorrow) so when I pulled the stitch tight then created a hanging loop, I decided to just continue knotting the rest of the strip above the knot which formed the far side of the hanging loop, using your basic half hitch knot (which is also commonly though somewhat inaccurately called a slip knot.)

When I looked at the finished product, I realized this would form a terrific rug start, and is much easier than braiding or chain stitching as well as providing a good sturdy start which would hold up no matter how much tension you put on your stitches.
Below is a picture of the result.


Playing with the concept more, I discovered another and possibly easier method- the overhand knot. This may well be the easiest most fool proof method of starting a rug yet! Take a LONG piece of your center color strip and just tie a series of overhand knots by folding it at the center and continuing to tie knot after knot until you have a start long enough for your needs (6" or shorter for a round rug, 6"+ for a an oval rug). When you're almost out of strip, either create one chain stitch or double the strip back through the end slit to create a thumb loop, and proceed with the start as with a chain stitch or braid.

The junction between strips is a square knot


I've long wanted to nail down the terminology of this craft, and while searching for information on different types of knots, I determined cutting a slit in the ends of the strips and passing the new strip up from under and through both slits forms a square knot. No wonder its so strong!

Monday, December 31, 2007

The finished puppy rug

I finally finished the special puppy rug for my friend's tea cup chihuahua. The top photo is the back view, the second is the frontal view, and after that is a video. This rug used several special techniques, one was one I 'invented' for this rug. The last three rows I "doubled back" on the row instead of continuing around in a spiral. The deep burgundy fabric is the hood from a sweatshirt. I punched holes just above the bottom hem, and inserted the needle through those holes before going through each bottom/base loop.


High res video


Online Videos by Veoh.com


Low res video

Friday, December 28, 2007

Still alive, still making rugs, have lots of stuff to post, but...

My real life has rather gotten in the way. Doncha hate it when that happens?

But on the rug front, its been very productive and fun.
  • I finished and sold the blue jean rug
  • almost finished the plastic shower curtain / umbrella rug
  • Started another jean rug
  • Started a rug made from a blanket (it will be my first single item, single color rug ever!)
  • Recorded my mother stitching
  • Recorded my mother telling the story many of her rugs and needles
  • Recorded my sister's amazing needle work
  • Almost finished a very odd shaped but fun "doggie rug" for a friend.
  • And best of all, almost finished my "magnum opus"- the anniversary rug which I've been working on off and on for almost a year. Look for a picture of it soon.

I'm itching to post the new videos, hope life slows down such that I can. Happy crafting, blessed New Year to all!

Wednesday, December 5, 2007

My my blue-jean rug be a blessing upon Cheryl and Warren as their friendship has been to me.


Its been a very eventful time for me. In my personal life, I'm finishing up my classes and fighting off a nasty cold/flu.

But in the midst of that, a dear friend of mine from the blog world- Cheryl- informed me that she was so taken with the beauty of this rug that she would like to buy it. Since I'd already planned on offering up it up on e-bay, but enjoy bargaining about as much as I enjoy doing taxes, and since Cheryl is such a dear person, that was perfect. But then she made it even more precious. For reasons she gets into on her blog, she asked me to say a blessing for her and her husband Warren over the rug. (She knows I am an ordained pastor, though I left the church body in which I was working, and am now in nursing school.) The rug is going out to her tomorrow, but the blessing is going out now, via this post, and the video. I've embedded the Veoh version, since I'm told that they show the videos at highest quality.

My dear wife Tess assisted with shooting the video and she wrote the blessing in Hebrew and English since
      • Her writing is legible
  • Her Hebrew is far better than mine (her degree is in Biblical languages!)
  • Cheryl is also her friend, and she wanted to be a part of this all.


Online Videos by Veoh.com

Questions, comments?

Blog Directory