


A youtube viewer of my videos, Rona, asks, "when making a rug do they tend to coil? or am I doing something wrong"
They do tend to cup up, this is very common, especially if you pull your stitches tightly as I do and my late grandmother did. She did hers so tightly she had to put piles of dictionaries on them for months to flatten them out.
The basic reason why this happens is that as you spiral your way outwards, each row is longer than the previous one. With my rugs, I've found they tend to increase by about an inch for each row on a round rug.
To address this, you need to add extra stitches called "doubles" or "duplicate" stitches, where you pass through the same bottom/base loop twice. If you don't, you wind up with a very thick stocking cap! (In fact, just for fun, I once made a stocking hat for our dog using very thin strips and this method.)
Generally, you need more double stitches early on- in the first 7 to 12 rows (when the rug is smaller than 16" across) than later.
For the first few rows, you might need doubles every other stitch.
Generally I recommend doing a double stitch every other stitch the first 4 to 6 rows, every third stitch the next 4 rows, and then go by feel.
This will vary by how tightly you stitch and which kind of material you use. The most fool proof method which I'll demonstrate when my wife is up to helping me do a video project is this: Look at the angle your needle is making between the baseloop and the top loop. If it is leaning backwards more than 30 degrees, its time for a double stitch.
Some people have trouble gauging this though, so a similar method to determine whether its time for more doubles is to just put the rug on a flat surface. If you can't make it lie flat easily, with very little effort, then you need to add more doubles.
If you are using a fabric which has spandex or a lot of give to it, you'll need to use a lot more double stitches, up to twice as many, which is one of many reasons I discourage beginners from using these materials until they are more confident with the technique.
Similarly in the opposite direction, plastic bags and very sturdy denim can be most unforgiving... they don't flatten out well.
If you have any more questions about this or any other issue, please post them. I love questions from you- it helps me know what I should be posting about, and helps me refine my teaching technique.
Wednesday, January 30, 2008
Tuesday, January 29, 2008
Q&A on rug starts, continued
 This picture is of the BACK of my "magnum opus" Anniversary Rug, the one shown in front view, B&W, in the letter in the Chicago Tribune.
Click on it to make it large- see that "v" shape, with the tail coming off the top left? That's a "fix" I did because the material I used to start this rug wasn't sturdy enough. As the rug grew to immense size, I noticed it was tugging pretty hard at the center. So I reinforced it using the same technique shown in the video series with my mother.
The moral of the story... even if you plan to use something with a loose springy weave for most of the rug, make your start (up to at least 5 rows) from a fabric which does NOT stretch and is very sturdy. Your basic cotton poly blends in a normal dress shirt or sheet work great, or you can even go with something more rugged like a light denim or men's dockers style pants.
I have gotten some more great questions here and on Youtube, and I'll be working to answer them both text and video. Thanks very much! I love getting questions, it helps me refine my teaching technique, and tells me what you need! I'll do it with my wife, since she's just learning to make the rugs herself, so she also asks good questions.
Monday, January 28, 2008
Q&A on how to start a rug, and which materials to use, carried over from Youtube
Over on Youtube, a person on viewing both my starting a rug from a braid and starting a rug using the half hitch method had this to say on the braid video when I suggested the half hitch as better:
First off, some historical background: This being a folk craft, the way it was taught and handed down in the past was by expert rug makers mentoring novices. This usually involved the mentor MAKING the first half dozen or so rug starts. The logic was... once you get comfortable with the stitch, once you get used to the fact that you can make "mistakes" and it will self-correct, you can better cope with making that great leap from a chain stitch or a braid to a regular row. I was making these rugs for almost 10 years before I did my first start.
I still think this is sound and is the best way, but over the years I've been teaching this, even though I can knock off a start in the time it takes me to walk the two blocks to the grocery store (and yes, I do stitch and walk at the same time... one of these days we'll have video of it) and have offered them to anyone who wants them, I found that anyone who wanted to learn the craft wants to know how to do it from start to finish.
I've struggled with how to teach this for years (I've been making these rugs over 30 years, and teaching the craft over 20, and mind you... I just turned 40), and its only recently that I decided it was plausible. To key things went into this:
1) The advent of inexpensive high quality video cameras (and if you've only seen the Youtube versions, wait till you see the Veoh versions below... Veoh streams at full D1 analog TV quality!)
2) I made a concerted effort to forget what I knew in terms of how its "supposed" to work, and come at it fresh.
Now... on to the issue at hand about starting rugs. While I do think the series of half-hitch knots is the best way to make an easy and strong start, really the best way for anyone is the one you can "grok"- grasp and put into effect. (Objectively speaking though, braids and half hitches will give a stronger center than a chain stitch.)
Which ever method you use, the trick is always the point at which you go from your start method... which ever it is... to doing the stitch. And that is pretty much the same which ever you use. You need a thumb loop and a base or bottom loop. How you get the thumb loop and how you decide which is your base loop is utterly irrelevant.
The other tricky thing is, for the first few times around the ends, you'll need to do triple or even quadruple stitches, and early on in a start, especially for a round rug, its not uncommon to need to do a double stitch every second or third stitch. When I learned, I asked my mother and grandmother for a mathematical ratio (so many doubles per row, decreasing at at a given rate for each succeeding row) because I always mix science with my art, and art with my science.
And if you would find that helpful... then here ya go... until the rug is well established, do a double stitch every other stitch for the 2 rows, then every third stitch for the next 2 rows, and so on. If doing an oval rug, that only applies to the ends.
That's not as exact as it sounds... it depends somewhat on how tightly you stitch and whether or not you use fabric with give, but I'm assuming (and dearly HOPING) a beginner isn't going to try using old pantyhose for his/her first rug! (Old hose make lusciously beautiful rugs which feel like you're walking on moss, but they are a devil to work with... you can't overpull or underpull or else it cups and pulls and ruffles...)
And speaking of fabrics with some give... my correspondent spoke of using T-shirts. They make fine rugs, and they're the sort of clothes most people have a pile of which should be recycled. (I'm wearing one such at the moment... the armpits are stained and are starting to come open, but... I digress.) Two major things to keep in mind when using fabrics which either have spandex or an open weave such they stretch is...
(I thought my poor wife was going to stick her needle through my septum when she came to her next fabric and it was cut from a lovely purple pair of corduroy pants! Cords are as heavy as jeans, but the nubbies make it stick to itself like velcro! )
Here's the high res Veoh versions of all my recent toothbrush rug tutorials and stories:
Online Videos by Veoh.com
I saw that one first but didn't strike home until I saw this one. Couldn't quite figure out where you were going with the half hitch.. why it was "easy". Makes sense now. (scurries away to find hubbies old t-shirts to practice with)
First off, some historical background: This being a folk craft, the way it was taught and handed down in the past was by expert rug makers mentoring novices. This usually involved the mentor MAKING the first half dozen or so rug starts. The logic was... once you get comfortable with the stitch, once you get used to the fact that you can make "mistakes" and it will self-correct, you can better cope with making that great leap from a chain stitch or a braid to a regular row. I was making these rugs for almost 10 years before I did my first start.
I still think this is sound and is the best way, but over the years I've been teaching this, even though I can knock off a start in the time it takes me to walk the two blocks to the grocery store (and yes, I do stitch and walk at the same time... one of these days we'll have video of it) and have offered them to anyone who wants them, I found that anyone who wanted to learn the craft wants to know how to do it from start to finish.
I've struggled with how to teach this for years (I've been making these rugs over 30 years, and teaching the craft over 20, and mind you... I just turned 40), and its only recently that I decided it was plausible. To key things went into this:
1) The advent of inexpensive high quality video cameras (and if you've only seen the Youtube versions, wait till you see the Veoh versions below... Veoh streams at full D1 analog TV quality!)
2) I made a concerted effort to forget what I knew in terms of how its "supposed" to work, and come at it fresh.
Now... on to the issue at hand about starting rugs. While I do think the series of half-hitch knots is the best way to make an easy and strong start, really the best way for anyone is the one you can "grok"- grasp and put into effect. (Objectively speaking though, braids and half hitches will give a stronger center than a chain stitch.)
Which ever method you use, the trick is always the point at which you go from your start method... which ever it is... to doing the stitch. And that is pretty much the same which ever you use. You need a thumb loop and a base or bottom loop. How you get the thumb loop and how you decide which is your base loop is utterly irrelevant.
- For the first stitch, just go through the first base loop and twist the thumb loop over.
- You'll probably need to go through the same bottom loop for your second stitch, and after this, it should look almost like a normal stitch.
- By the third stitch, which you can probably do on the next bottom/base loop, it will look and act like it should.
The other tricky thing is, for the first few times around the ends, you'll need to do triple or even quadruple stitches, and early on in a start, especially for a round rug, its not uncommon to need to do a double stitch every second or third stitch. When I learned, I asked my mother and grandmother for a mathematical ratio (so many doubles per row, decreasing at at a given rate for each succeeding row) because I always mix science with my art, and art with my science.
And if you would find that helpful... then here ya go... until the rug is well established, do a double stitch every other stitch for the 2 rows, then every third stitch for the next 2 rows, and so on. If doing an oval rug, that only applies to the ends.
That's not as exact as it sounds... it depends somewhat on how tightly you stitch and whether or not you use fabric with give, but I'm assuming (and dearly HOPING) a beginner isn't going to try using old pantyhose for his/her first rug! (Old hose make lusciously beautiful rugs which feel like you're walking on moss, but they are a devil to work with... you can't overpull or underpull or else it cups and pulls and ruffles...)
And speaking of fabrics with some give... my correspondent spoke of using T-shirts. They make fine rugs, and they're the sort of clothes most people have a pile of which should be recycled. (I'm wearing one such at the moment... the armpits are stained and are starting to come open, but... I digress.) Two major things to keep in mind when using fabrics which either have spandex or an open weave such they stretch is...
- you will need to cut your strips up twice as wide as if you were using- say- an old dress shirt or bedsheet.
- you do need to be careful to not pull the stitches too tightly, or else the rug will cup up into a basket. If you do find yourself pulling tightly, you can compensate by adding more double stitches.
(I thought my poor wife was going to stick her needle through my septum when she came to her next fabric and it was cut from a lovely purple pair of corduroy pants! Cords are as heavy as jeans, but the nubbies make it stick to itself like velcro! )
Here's the high res Veoh versions of all my recent toothbrush rug tutorials and stories:
Online Videos by Veoh.com
Sunday, January 27, 2008
Welcome Readers of the Tribune - How to use this site & video: the most fun you can have recycling!
Welcome readers of the Chicago Tribune's Home & Garden section. I'm glad they saw fit to publish my note about my "little craft", and I'm glad you're here.
The best way to use this site is to click on the keyword which most interests you. This blog is a mixture of tutorials, pictures, and stories of what went into the rugs, etc.
Online Videos by Veoh.com
The best way to use this site is to click on the keyword which most interests you. This blog is a mixture of tutorials, pictures, and stories of what went into the rugs, etc.
Rescued from the landfill for rugs- Veoh high res version
Online Videos by Veoh.com
Rescued from the landfill for rugs- Youtube low res higher speed version
Wednesday, January 23, 2008
Three rug stories by my mother and some tips too

I asked my mother to tell the story behind some of the rugs she made. I shot this in D1 quality but at a lower frame rate. One is a rug she made from her mother's old coats. Another is a rug she made of her old dresses A third is one she made of her old bathrobes (I remember going shopping with my father to buy her those!) She also discusses a bit of the technique of doing color block rows.
(The photo is 2 years old of her down at Berger Park holding the rug I made for Berger Park.)
Online Videos by Veoh.com
Tuesday, January 15, 2008
The problem of lint
I post my rug videos on several services and on my other sites, and on one of them the following comment was left after my previous video on starting a rug with the half hitch knot:
I'm not surprised- its the basic knot behind many crafts. Yeh, this is MUCH easier and quicker way to get a good start than the braiding or chain stitching most rug makers use.
Funny you should mention the fiber problem. One of the videos I have from my trip back to your 'hood is of my mother talking about my Grandmother- the rug matriarch who got us all going on this- who refused to use cotton or linen after a while, and used only cotton poly or synthetics for just that reason.
Its also something of a matter of how you cut it. This makes a big difference in, say, working with jeans or cords. If you cut with the natural grain of the fabric, it will fray out a LOT less.
Broadcloth, your light weight cotton poly blends as used for men's dress shirts, clerical shirts, many blouses, etc. doesn't fray unless you go out of your way to make it do so, like cutting diagonally across it!
T-shirt and jersey mat'l doesn't either, though you do have to cut your strips extra wide- at least double the normal width- to account for how stretchy they are.
Generally, the tighter the weave and smaller the fibers, the less lint. I used a few strips of a very coarsely woven shower curtain (think burlap) a few times in my anniversary rug, and I had one strip left over which I worked into my new "remnant/romper room" rug, but that was just too much for me.
Since I swiffer and vacuum several times a week to deal with the dog hair and grime (we have all wood floors- if I don't keep up with it, it feels like we're living on a beach!) , it doesn't usually bother me, but that stuff lost about 1/2 its width after an inch and half of stitching!
Plastic bags and pantyhose of course yield no lint, so if that's your "prime directive" go with them.
Bed sheets are great too.
Dockers type pants/slacks, anything remotely like denim, is going to give you a fair amount of lint.
Perversely, even though Grandma preferred synthetics, after the shower curtain the worst lint problem I've ever had was with some really tacky old K-mart special "dress pants" from the 80s. The weave was loose, the fibers thick, and being synthetic, they stuck to everything like glue. I think I finally consigned that stuff to doggy-bed purposes too.
the half hitch was used for macrame! I should be able to do that! [Rug Goth] do you guys have a problem dealing with the floating fibers? I have been waiting to work on my rug until I can sit out side on the porch because the fibers really fly about the room. I have it all over my clothes, the chair I'm sitting in and I feel as though I'm breathing them. Maybe it is just eh material I'm using?
My response:
I'm not surprised- its the basic knot behind many crafts. Yeh, this is MUCH easier and quicker way to get a good start than the braiding or chain stitching most rug makers use.
Funny you should mention the fiber problem. One of the videos I have from my trip back to your 'hood is of my mother talking about my Grandmother- the rug matriarch who got us all going on this- who refused to use cotton or linen after a while, and used only cotton poly or synthetics for just that reason.
Its also something of a matter of how you cut it. This makes a big difference in, say, working with jeans or cords. If you cut with the natural grain of the fabric, it will fray out a LOT less.
Broadcloth, your light weight cotton poly blends as used for men's dress shirts, clerical shirts, many blouses, etc. doesn't fray unless you go out of your way to make it do so, like cutting diagonally across it!
T-shirt and jersey mat'l doesn't either, though you do have to cut your strips extra wide- at least double the normal width- to account for how stretchy they are.
Generally, the tighter the weave and smaller the fibers, the less lint. I used a few strips of a very coarsely woven shower curtain (think burlap) a few times in my anniversary rug, and I had one strip left over which I worked into my new "remnant/romper room" rug, but that was just too much for me.
Since I swiffer and vacuum several times a week to deal with the dog hair and grime (we have all wood floors- if I don't keep up with it, it feels like we're living on a beach!) , it doesn't usually bother me, but that stuff lost about 1/2 its width after an inch and half of stitching!
Plastic bags and pantyhose of course yield no lint, so if that's your "prime directive" go with them.
Bed sheets are great too.
Dockers type pants/slacks, anything remotely like denim, is going to give you a fair amount of lint.
Perversely, even though Grandma preferred synthetics, after the shower curtain the worst lint problem I've ever had was with some really tacky old K-mart special "dress pants" from the 80s. The weave was loose, the fibers thick, and being synthetic, they stuck to everything like glue. I think I finally consigned that stuff to doggy-bed purposes too.
Monday, January 14, 2008
Tutorial & video: The easiest method to start a rug & chosing colors
I stumbled across this idea when I was tying off a little trivet I made while my wife was in the hospital. I noticed that the series of half hitch knots I made around the hanging loop looked for all the world like the normal row... much more than braids or chain stitches do.
My wife is home from the hospital now, and as she's learning the craft, she was watching and filming it.
My papillon Hilde makes a cameo.
At the end I give some guidance about how I chose the colors for a rug- I start with the start, and follow the "dao" of the rug from there.
Hilde my papillon always wants to be involved with the rugs I make, even the starts, so she provides comic relief!
Text tutorial
Take a thick or heavy strip-in the video I use the button holes strip from a blouse- this will be what you tie around, like the green pole in the picture.
Splice a piece of rug material to it, and from the splice end, start tying a series of half hitch knots until you have a long enough start-
* For a round rug, anything under 6 inches should work, but 2 or 3 inches is sufficient.
* For an oval rug, you'll need one much longer
* For a square or rectangular rug, you'll need a start as one long as your longest edge.
When you have a long enough start, create a loop around your thumb
Insert the needle through the SECOND loop to the right, and use the first loop to the right as your "top loop". You won't have a "middle loop" on this stitch, but you will the next, don't worry!
Twist your thumb loop over, and voila, you're stitching a rug!
For the first stitch you'll probably need to do a double stitch, but after that you won't need to do any more than normal.
Going around the ends the first few times, you may even need to do a couple of triple stitches.
Online Videos by Veoh.com
My wife is home from the hospital now, and as she's learning the craft, she was watching and filming it.
My papillon Hilde makes a cameo.
At the end I give some guidance about how I chose the colors for a rug- I start with the start, and follow the "dao" of the rug from there.
Hilde my papillon always wants to be involved with the rugs I make, even the starts, so she provides comic relief!
Text tutorial
Take a thick or heavy strip-in the video I use the button holes strip from a blouse- this will be what you tie around, like the green pole in the picture.
Splice a piece of rug material to it, and from the splice end, start tying a series of half hitch knots until you have a long enough start-
* For a round rug, anything under 6 inches should work, but 2 or 3 inches is sufficient.
* For an oval rug, you'll need one much longer
* For a square or rectangular rug, you'll need a start as one long as your longest edge.
When you have a long enough start, create a loop around your thumb
Insert the needle through the SECOND loop to the right, and use the first loop to the right as your "top loop". You won't have a "middle loop" on this stitch, but you will the next, don't worry!
Twist your thumb loop over, and voila, you're stitching a rug!
For the first stitch you'll probably need to do a double stitch, but after that you won't need to do any more than normal.
Going around the ends the first few times, you may even need to do a couple of triple stitches.
Youtube version
Veoh- Highest Res
Online Videos by Veoh.com
Thursday, January 10, 2008
Advanced Technique: Mending a rug made weak by wear or by canine chewing
When I was last home, my mother wanted me to show her how I use the same basic technique as is used to make the rugs to mend them.
Though these rugs are durable and are known to last DECADES, sometimes due to a weak fabric, a thin strip, loose stitching, or canine chewing, holes and weak spots develop.
Online Videos by Veoh.com
Online Videos by Veoh.com
Online Videos by Veoh.com
Online Videos by Veoh.com
Online Videos by Veoh.com
Online Videos by Veoh.com
Online Videos by Veoh.com
Though these rugs are durable and are known to last DECADES, sometimes due to a weak fabric, a thin strip, loose stitching, or canine chewing, holes and weak spots develop.
The videos
In high quality Veoh only... if you have trouble with viewing them, try them on Google Video or Youtube.
Mending a rug, part 1
Online Videos by Veoh.com
Part 2
Online Videos by Veoh.com
Part 3
Online Videos by Veoh.com
Part 4
Online Videos by Veoh.com
Part 5
Online Videos by Veoh.com
Part 6
Online Videos by Veoh.com
Part 7 Final
Online Videos by Veoh.com
Rug making tips from my sister
My sister is also a master rug maker, though she does things differently than I do (she stitches more loosely, etc, calls it a pick not a needle, and so forth.) When I was last back home I asked her to share her wisdom and encouragement, and here it is!
Online Videos by Veoh.com
Online Videos by Veoh.com
Tuesday, January 8, 2008
A video "tour" of my magnum opus rug, the "Anniversary Rug"
Here's a video tour of my magnum opus, the anniversary rug. I've been trying to get good stills to do it justice, but I've not been satisfied with the detail and color rendition yet, and since I've been promising to show you the finished product for some time, here you go.
Each rug has its own beauty both aesthetically and practically, but Tess and I think this is the most beautiful I've ever made. The design of it was free flowing but you'll notice some repeating elements / colors which unite it together, rather as the repeating theme unites a fugue
So the rug has four parts or stages:
The next stage- the massive main body-I pretty much made up as I went along. I'd pull out an old piece of clothing, hold it up against the rug, and Tess and I decided whether or not it worked.
The final two stages were more carefully planned, to make sure it would finish off as beautifully as it'd started. I even lugged this beast on the "L" and bus to consult with Tess in the hospital room, since though I was making the rug, it celebrates OUR love and life together.
To do otherwise would take something which is a relaxing stress relief for me and make it work. Some rug makers do much more elaborate designs, and should someone want to pay me enough to adhere to a tightly planned design, I'd do it, but otherwise... I just go with the flow.
The most elaborate design I've ever done is the "Berger Park / Lake Michigan Rug." If I've not posted pictures of it, I'll do it sometime soon so you can see what a more precisely planned rug looks like.
When my wife gets home from the hospital (at current projections, late this week, but this is one of her mist intractable migraines ever, so I'll believe it when she's home in my arms) I'll get a video of us talking about the various clothes which went into it- the dress she wore when we got engaged, my honeymoon silk bathrobe, etc. Maybe I'll have some stills which will do it justice by then.
Online Videos by Veoh.com
Each rug has its own beauty both aesthetically and practically, but Tess and I think this is the most beautiful I've ever made. The design of it was free flowing but you'll notice some repeating elements / colors which unite it together, rather as the repeating theme unites a fugue
So the rug has four parts or stages:
- The center which features solid rows,
- The main body which features two types of rows:
- The first alternates solids and prints
- The second alternates solids so that different prints do not overlap each other, row to row
- The final stage which returns to solid blocks of color which do not form complete rows but whose length represents and approximates the prominence of those color elements in the previous two stages
- The final black finishing row, which echoes the solid black center and provides a visual frame.
The next stage- the massive main body-I pretty much made up as I went along. I'd pull out an old piece of clothing, hold it up against the rug, and Tess and I decided whether or not it worked.
The final two stages were more carefully planned, to make sure it would finish off as beautifully as it'd started. I even lugged this beast on the "L" and bus to consult with Tess in the hospital room, since though I was making the rug, it celebrates OUR love and life together.
Generally most of my rugs are very "free form"
I throw together 20-30 pounds of clothes (the amount it takes for a 22-26" round rug) and decide what will work together. As I go along, I just try to follow the "dao" of the rug... I let it tell me what will look best.To do otherwise would take something which is a relaxing stress relief for me and make it work. Some rug makers do much more elaborate designs, and should someone want to pay me enough to adhere to a tightly planned design, I'd do it, but otherwise... I just go with the flow.
The most elaborate design I've ever done is the "Berger Park / Lake Michigan Rug." If I've not posted pictures of it, I'll do it sometime soon so you can see what a more precisely planned rug looks like.
When my wife gets home from the hospital (at current projections, late this week, but this is one of her mist intractable migraines ever, so I'll believe it when she's home in my arms) I'll get a video of us talking about the various clothes which went into it- the dress she wore when we got engaged, my honeymoon silk bathrobe, etc. Maybe I'll have some stills which will do it justice by then.
The high quality Veoh version
Online Videos by Veoh.com
Should you have trouble with the Veoh version, look for it on Google Video or Youtube. I've been trying to upload it to the latter all day, and it hasn't worked yet.
Thursday, January 3, 2008
Tutorials: Finishing a rug, finishing off a solid color row

Background: I was finishing the rug made of the clothes my wife and I wore when we wooed and fell in love 13 years ago, and as she was in the hospital, and the rug celebrates our love and marriage, I lugged the huge rug down on the L and bus to finish with her.
(In a future post I will show detailed pictures of this, my "opus magnum" so you can see more detail. But for ease of people finding tutorials about various topics, I'm keeping those sorts of posts separate from these.)
When I was doing it, she wanted me to explain how you finish a color band row or solid color row, and as I had the camera along to take stills of her with the rug anyway, I recorded my final stitches and tying off of the rug while explaining it to her and answering her questions.
The lighting gives a spooky or film noir overtone, but I think the video is made better by my wife's interaction, as while a brilliant linguist and utter genius, she's just started doing this craft.
Finishing a row of one solid color
When finishing off a row of a given color or pattern, it is best to overlap by a few stitches so that the color is joined when the rug is viewed from any angle. This is especially important when the row is the final row of a rug, as in this case.
High res Veoh version
Online Videos by Veoh.com
Low res Youtube
Tying off the rug
When you're done with your rug, there's any number of ways to tie it down. The stitch is incredibly resilient, it isn't going to unravel or pull loose regardless. Still, this is how I usually do it.
- I do the last few stitches very tightly (even for me)
- I use a thinner strip or a graduated strip for an even blending of the end of the row into the preceding row.
- For the final stitch, I pull it down as tightly as I can,
- I run the strip in a basket weave pattern (over under) for three loops along the row,
- I do three loops in the other direction along the previous row
- And finally I tie it off using two half hitch knots (see previous post about these.)
Again, don't worry, do what ever you want and what ever works for you, but this technique will give you a clean visually attractive finish.
High res Veoh version
Online Videos by Veoh.com
Low res Youtube version
Wednesday, January 2, 2008
Starting a rug using overhand and half hitch knots

I'm always learning new things about this craft, just by paying attention to what its telling me. This morning I was tying off the end of a rug start I decided to convert to a trivet (you'll see it in the original untied form in a post later today or tomorrow) so when I pulled the stitch tight then created a hanging loop, I decided to just continue knotting the rest of the strip above the knot which formed the far side of the hanging loop, using your basic half hitch knot (which is also commonly though somewhat inaccurately called a slip knot.)
When I looked at the finished product, I realized this would form a terrific rug start, and is much easier than braiding or chain stitching as well as providing a good sturdy start which would hold up no matter how much tension you put on your stitches.
Below is a picture of the result.

Playing with the concept more, I discovered another and possibly easier method-
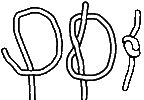 the overhand knot. This may well be the easiest most fool proof method of starting a rug yet! Take a LONG piece of your center color strip and just tie a series of overhand knots by folding it at the center and continuing to tie knot after knot until you have a start long enough for your needs (6" or shorter for a round rug, 6"+ for a an oval rug). When you're almost out of strip, either create one chain stitch or double the strip back through the end slit to create a thumb loop, and proceed with the start as with a chain stitch or braid.
The junction between strips is a square knot

I've long wanted to nail down the terminology of this craft, and while searching for information on different types of knots, I determined cutting a slit in the ends of the strips and passing the new strip up from under and through both slits forms a square knot. No wonder its so strong!
Subscribe to:
Posts (Atom)

